Create an Animated Christmas Candle in Procreate

20 Brushes Included and Instructions to Make and Edit More
Udemy
platform
English
language
Design Tools
category
0
students
44 mins
content
Jan 2023
last update
$19.99
regular price

What you will learn

Learn the step-by-step method for making the original candle illustration Procreate.

Learn tips for creating realistic highlights and shadows.

Learn about adjusting to perfect the animation and adding lighting elements in the second iteration of the animation.

Learn methods for setting the speed and timing using the frame rate.

Description

Have you thought animation was a skillset that just seemed unattainable? Have you looked at animation programs and just thought to yourself there was no way you could wrap your head around it? Have you wanted to use an iPad for hand drawn animation? Well, Procreate has the Animation Assistant as a feature, which lets you animate with traditional 2D art in a super quick and easy way!

Anyone can learn to create an animation with Procreate. The features are really intuitive and simple to use, and in just a few easy steps, you can add motion and bring illustrations to life as exportable animated GIFs. This new class, Intro Animated Christmas Candle in Procreate, will show you some of my animation methodology, and ways to use brushes to create the animation.

Procreate animation uses the techniques of frame-by-frame animation. In other words, you will use several frames of the same illustration, making slight changes to each one. Then, Procreate will play those frames in a loop, creating the illusion of motion.

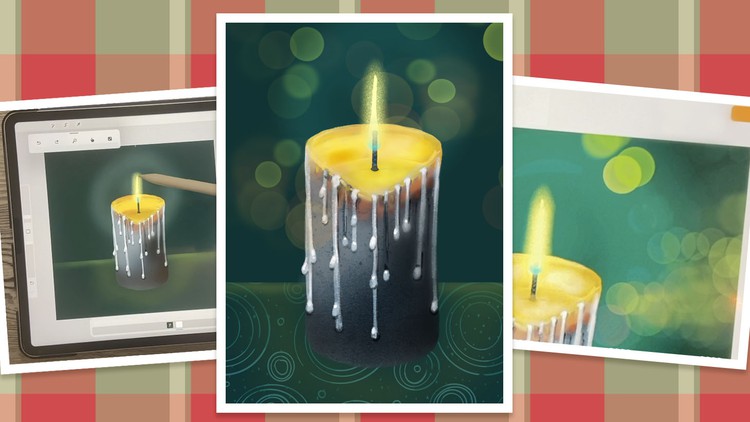
In the class, I take you from start to finish in creating an animated candle. And, I have techniques to make the flame flicker and the lighting look realistic. We make use of layers and layer groups in this simple method to be sure the animation that we’ll be creating is completely editable. One of my goals is to show you how easy the process is, so I don’t even use onion skinning. We will save that for a follow-up class!

In this class I’ll walk you through:

  • my step-by-step method for making the original candle illustration Procreate

  • tips for creating realistic highlights and shadows

  • my workflow for use of layers, layer groups and other great features like snapping

  • adjusting to perfect the animation and adding lighting elements in the second iteration of the animation

  • methods for setting the speed and timing using the frame rate

  • a discussion over the different output methods and a final output of an animated gif

If you have a basic knowledge of Procreate, you’ll be able to go through all the steps. You learn as much about illustration as you do animation in this class. This class will benefit anyone who wishes to expand their illustration skillset and I always pepper the class with tidbits to help improve efficiency.

The key concepts I will include:

  • review of my brush alterations and adjustments

  • a look at Procreate animation and how to use all the different settings

  • approaches you can take planning your animation

This is an ideal class for you, even if you are not sure what you will use the animation for, whether it be social media or to send to family and friends over the holiday season! Learning new Procreate workflows is always desirable. I guarantee you will create something really appealing, and the result is so rewarding to see!

Intro Animated Christmas Candle in Procreate

This short intro will give you an overview of the class.

Lesson 1: Setting Up the Original Base Illustration

In this lesson, I will show you the objectives for class and explain the first steps of our illustration. We make use of a clipping mask to add a gradient of color to darken some areas and we will make the initial drips.

Lesson 2: Dimension and Adding Other Details

In this lesson, I will break down the complete process of adding dimension to the drips of wax. We create highlights and shadows and continue to add other shading and highlights wherever necessary. At the end of the lesson, we add a wick. I list every brush I use and those are all supplied with the class. I explain how to make simple adjustments to brushes to make them work for you.

Lesson 3: Setting Up the Lighting and Animation

In this lesson, I will draw the flame with a glow, and we talk about a bunch of other considerations to help our artwork look more realistic. I will show you some of the key techniques I use and explain every step of the way. By the end of the lesson, you will have the illustration complete with plenty of interest, and you will know how to use most of the brushes in the accompanying download. I explain the basics of the Animation Assistant as well and we are now fully prepared to animate.

Lesson 4: Animating the Flame and Glows

This is the lesson in which I teach you about the actual steps in animating the candle, and how to make the slight adjustments that will make the flame flicker and move. We will also make the glow waver somewhat. I show you a bunch more adjustments mainly made with the liquification push feature as we work our way through this lesson. We test our animation and decide what could be done to improve it and add interest.

Lesson 5 Adding Extras and Special Effects

In this lesson, we add the bokeh lights and make other small adjustments. You will see me use several different techniques to make everything work. We then test the animation and I explain more of the settings in the animation assist settings panel.

Lesson 6: Conclusion, Mockup and Next Steps

We will conclude everything in this lesson, and we end with a chat about next steps.

Concepts covered:

Concepts covered include but are not limited to Procreate illustration, the Animation Assistant, the Animation Assistant settings panel menu, layering, transparency, Procreate animation settings, frame rate in Procreate, the Liquification push feature, Procreate canvas settings, adjusting Procreate brushes, sizing of documents and brushes, following a reference, how to open a reference image in Procreate, adding texture brush stamps, procreate brushes for adding interest, workflow best practices, painting best practice, Procreate composites, exporting as an animated gif, various techniques with paints and blending to add interest, and much more.

You will get…

  • 44 minutes of direction from an instructor who has been in graphic design business and education for over 40 years

  • knowledge of multiple ways to solve each design challenge

  • an outline with links to further research

  • a list of helpful online sites to further your education into Procreate Animation

Project Description

For another seasonal project packed with fun, challenge yourself today and create this candle animation. Download and install the Procreate brushes provided to get started on your illustration. Find a good reference image and import it. Work through each of the lessons, applying the concepts as I teach them. Try to create at least one brush, or experiment with changing settings on the brushes provided. Create a simple dimensional candle illustration with melting wax drips.

Content

Introduction

Setting Up the Original Base Illustration
Dimension and Adding Other Details
Setting Up the Lighting and Animation
Lesson 4: Animating the Flame and Glows
Adding Extras and Special Effects
Final Output Explain in Detail
Wrap Up and Closing Thoughts

Screenshots

Create an Animated Christmas Candle in Procreate - Screenshot_01Create an Animated Christmas Candle in Procreate - Screenshot_02Create an Animated Christmas Candle in Procreate - Screenshot_03Create an Animated Christmas Candle in Procreate - Screenshot_04
5104568
udemy ID
1/22/2023
course created date
1/30/2023
course indexed date
Bot
course submited by