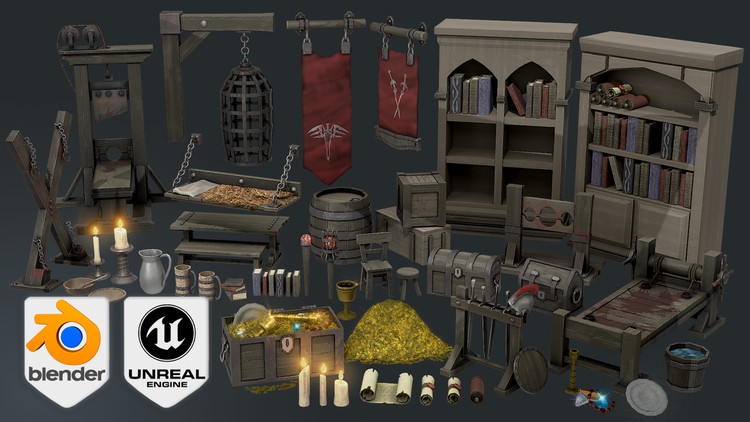
Blender to Unreal Engine Become a Dungeon Prop Artist

Become a prop artist using Blender & Unreal Engine with this amazing step by step complete guide.

4.95 (107 reviews)
Udemy
platform
English
language
3D & Animation
category
instructor
2,531
students
29.5 hours
content
Jan 2024
last update
$74.99
regular price

What you will learn

• Enjoying the 3D prop and game asset modelling to game environment transition from Blender to Unreal Engine 5 - the only one out there like it for all fantasy

• Creating over 50 stunning medieval dungeon assets and props enabling you to build an underground dungeon environment unique to every student

• Using Blender 3 and understanding its new interface and shortcuts

• A course within a course introduction into (a) Blender basics, (b) materials and textures, (c) seams, sharps, and UVs.

• Maximising the potential of your references to develop strong game asset concepts using Pureref

• Completing a comprehensive crash course in geometry nodes in Blender

• Creating rope and chain geometry nodes with optional side bars for ease of use

• Becoming a Blender node guru by adding nodes to your imported maps to completely change the way they look and feel

• Understanding modifier stacking

• Creating larger 3D props from smaller ones to populate an environment

• Making a bucket water material using texture maps and opacity along with the gamma node in Blender

• Bringing your 3D models and props to life with custom materials, adding decals like straw, blood, and stamps

• Learning how to use HDRIs as 3D model backgrounds for your portfolio

• Utilising rendering to improve the quality of presentation for your 3D environment by rendering out in both of Blender’s rendering engines - Eevee and Cycles

• Choosing to continue your 3D modelling to game engine journey by completing the second (independent) part of the course in Unreal Engine 5

• Optimising 3D game assets ready to export them into Unreal Engine 5

• Preparing asset collections for UE5 integration and setting up material instances for them

• Exploring different transparency materials that will help you set up cut-out decals, partially transparent decals with PBR values and two side-faced textures

• Understanding how to set up built-in decal planes within your assets and how to create your decal projections that not only will be applied to an asset but wi

• Master the use of the refraction values to help you set up a variety of gems and water materials in Unreal Engine 5

• Learning how to set up and generate a variety of different collisions for your assets to help your playable character interact better with the world

• Setting up an asset pack that can be easily imported onto any Unreal Engine 5 project

• Maintaining and optimising medieval Europe aesthetics for a full medieval dungeon scene using an Unreal Engine 5 skybox

• Presenting your medieval dungeon asset pack in Unreal Engine 5 and rendering out a turntable video

• Complete the course which is going to be the first stepping stone to creating your 3D world and RPG game environment

Description

Course Description


Have you ever wanted to build an entire game world using 3D props and assets that will populate your space and envelop players in a medieval fantasy?


Join ‘Blender to Unreal Engine Become a Dungeon Prop Artist’ to take your 3D modelling skills up a notch! Graduate to the next level of game design through learning all about the Blender to Unreal Engine 5 (UE5) professional workflow for medieval dungeon props.

Build a small armory for your dungeon’s guard room, equipped with a couple of swords and a helmet next to a table with a candle on top, burning the night away as the guard's sleep. And MUCH more!!


Learn how to create 50+ assets in over 30 hours!


We have designed the course from the ground up to make sure that no matter your skill level, you will easily be able to follow along and more importantly learn most of the skills to create your own 3D game prop set.


Our ‘Blender to Unreal Engine Become a Dungeon Prop Artist’ top 7:


1. Learn how to create over 50 3D dungeon props from scratch

2. Download over 100 unique texture maps for both Blender & Unreal Engine 5 (UE5), built exclusively for this course

3. Create rope and chain geometry nodes with optional side bars for ease of use

4. Join a complete guide on rendering out in both of Blender’s rendering engines - Eevee and Cycles - and master using Blender’s compositor for amazing professional renders

5. Enjoy full Unreal Engine 5 (UE5) integration, giving you game-ready working 3D assets for your medieval dungeon environment and more

6. Bring your 3D models and props to life with custom materials, adding decals like straw, blood, and stamps

7. Become a Blender node guru by adding nodes to your imported maps to completely change the way they look and feel


I imagine you using these props in what is becoming 3D Tudor’s up-and-coming best seller, ‘Blender 3 to Unreal Engine 5 Dungeon Modular Kitbash’!


Think about it – all these assets would fit perfectly within the rooms we created, making your 3D dungeon game environment alive with the power of storytelling.

Although guillotines were introduced later than the medieval historical period our other assets are meant to depict, we thought you would enjoy learning how to make them as part of ‘Blender to Unreal Engine Become a Dungeon Prop Artist’. We will be ensuring that our model is structurally accurate. For example, we need to make sure that the structure can hold the weight of all its counterparts, including the blade.


What about creating an interior for your castle with ‘Creating a Modular Kitbash in Blender’ and using these to populate the space too and create an environment that everyone will talk about?

This course will give you access to just over 30 hours of 3D art in around 160 comprehensive lessons.


This course will see you learn all the techniques pros use and how they use them. Learn how to achieve realism using custom materials to create blood spatter that will look perfect for your torture chamber at the bottom of your dungeon!


Blender


Create the ‘Blender to Unreal Engine Become a Dungeon Prop Artist’ props and walk through the halls of your very own medieval dungeon with banners, cages, and a not-so-medieval but very torturous and iconic, guillotine.

Have you ever wanted to learn how to model gems and treasure coins to add that extra glow to your scene?

You will do just that!

‘Blender to Unreal Engine Become a Dungeon Prop Artist’ will see you build 3D props fit for the medieval dungeon of your dreams (or nightmares!), including but not limited to:

- House banners

- Wall cages

- Stocks like in Game of Thrones (GoT)

- A stretching rack

- A guillotine

- Traditional stocks

- A straw bed

- Table and chairs

- Torches

- A weapons rack

- Candles, books, parchment, gems, and other furniture

Master geometry nodes to speed up your workflow. You will be able to alter how a prop looks (i.e., its geometry) using node-based functions. We will also set up the geometry node variable menus in the modelling tab to save you time rather than going into the geometry nodes menu every time. I will also be introducing you to another hidden addon in Blender – the loop tools addon. It enables you to create circles and circles in geometry, allowing you to bridge your geometry with two clicks


Following the success of my latest courses, we will be modelling, texturing, and finalizing every individual asset before moving on to the next. Students have said that this has helped them in staying excited throughout the creation process, being able to see how their scene comes closer to the course preview step-by-step.


Of course, you could set yourself a challenge and diversify aspects of the medieval dungeon props such as changing the textures, adding different variations, or more assets such as different doors and smaller assets like chains on the wall to make your medieval dungeon more alive.

Find out how to set up materials Blender. Change them to suit your needs by adding adjustment modes and becoming a true texturing genius. For an extra touch of detail, you will learn how to use the grease pencil to draw lines to turn them into curves, and finally, into 3D mesh. This is a great technique for creating swirls and ornamental work.

Use ‘Blender to Unreal Engine Become a Dungeon Prop Artist’ to master UV editing using edge seam creation, custom projection and UV manipulation to make the best use of your seamless textures.

Instead of choosing one rendering engine over another, you will be learning how to use Blender’s Eevee and Cycles X renderers to get the most out of your prop presentation.


Unreal Engine 5


Through ‘Blender to Unreal Engine Become a Dungeon Prop Artist’ you will be learning everything right from importing individual models from Blender to having them work correctly in UE5. We will be manually importing our asset collection and setting up material instances for them. One of the most interesting parts of the UE5 part of this course will be that we will be setting up torch blueprints with realistic fire particle animation and light flicker to bring your scene to life.

We will look at how to import and use textures created specifically for Unreal Engine and use them to create the materials for our medieval dungeon props. You will find out how to change PBR texture values by directly adjusting their information from within, built in the image editor.


Next, we will set up PBR materials with adjustable parameters that will allow you to change the intensity of the normal map (e.g., adjust colour, change roughness values, and more). You will work through the different transparency materials that will help you set up cut-out decals, partially transparent decals with PBR values and two side-faced textures.


‘Blender to Unreal Engine Become a Dungeon Prop Artist’ will also be an introduction to how to set up files to create a clean UI. The skills you learn here are fully transferable to all your future builds.


One of the most exciting things about ‘Blender to Unreal Engine Become a Dungeon Prop Artist’ is that you will create collisions for your props to block out your playable character. This will help your assets fit in seamlessly within your ‘Blender 3 to Unreal Engine 5 Dungeon Modular Kitbash’, ready to test out with your UE5 character. To optimise your time, you will learn a method for placing your assets quickly within any type of game level.

Your UE5 milestone project will be to present your asset pack in Unreal Engine 5 and render out a turntable video.


Course Resources & Freebies


The ‘Blender to Unreal Engine Become a Dungeon Prop Artist’ resource pack includes 27 unique seamless materials, 1 atlas material for the books, 1 trim sheet for gold decorations, 7 ornaments set up with PBR materials, 3 unique blood PBR materials, 2 transparency detail textures (i.e., straw and helmet feather), and 1 UE5 animation texture for the Niagara fire particle system. You will be getting a total of 297 texture maps. You will be getting a total of 297 texture maps.


Join this course and come be part of a game design journey of over 30 hours of learning that will see you go away with over 50 game-ready medieval props for your dungeon in just 160 lessons.


Check out the free introduction and I am sure you won’t be able to put this course down!


To get you pumped, imagine how well this 3D props set fits in with your other 3D Tudor projects.

Be creative! Feature your medieval dungeon assets inside a medieval castle keep with ‘Creating a Modular Kitbash in Blender’. Also, think about using them in other medieval environments such as ‘Blender 3 The Ultimate Medieval Scene Course’, and adding more assets that would exist in farms such as bags of grain, a hearth, and different tables based on the skills you learned.


Pair up your guillotine with some gallows using ‘Blender to Unreal Engine 5 | 3D Props | Medieval Gallows’ to master the look of your medieval castle’s execution area. Use the full power of Blender 3 and Unreal Engine 5 (UE5) to your advantage.


Until next time, happy modelling everyone!


Neil – 3D Tudor

Content

Download Pack & Blender Basics

Lesson 1 – Going Through the Dungeon Download Pack
Lesson 2 – An Introduction to the Blender Basics
Lesson 3 – Working with References

Section 2 – Basic Modelling Workflow

Lesson 4 – Starting our First Model
Lesson 5 – Working with Modifiers
Lesson 6 – Finishing our First Basic Mesh

Section 3 – Preparing our Meshes for Texturing

Lesson 7 – What is Smooth Shading
Lesson 8 – Marking Seams & Sharps Introduction
Lesson 9 – Importing Texture Maps with Node Wrangler

Section 4 – Working with lighting in Blender

Lesson 10 – Setting up our HDRI Lighting
Lesson 11 – Direct & Infinite Light Sources

Section 5 – Setting up & Customising Materials

Lesson 12 – Setting up our First Materials
Lesson 13 – How to Customise Imported Texture Maps

Section 6 – Setting up our Asset Manager

Lesson 14 – Working with the Asset Manager
Lesson 15 – How to Populate our Asset Manager

Section 7 – Basic 3D Modelling Workflow

Lesson 16 – The Problems with Auto Smooth
Lesson 17 – Working with a Basic Workflow
Lesson 18 – Fixing Issues with UV Unwrapping
Lesson 19 – Finishing our Table & Chairs

Section 8 – Mid Level 3D Modelling Workflows

Lesson 20 – Working with the Solidify Modifier
Lesson 21 – Finishing off our Utensils
Lesson 22 – Using the Grease Pencil for Curves
Lesson 23 – Creating the Ale Mug Handles

Section 9 – Mid Level Texturing Workflow

Lesson 24 – Fixing Problematic Seams
Lesson 25 – Building up our Asset Library
Lesson 26 – Using Trim Sheets Effectively

Section 10 – Creating the Crown Jewels

Lesson 27 – Good Techniques to Create Gemstones
Lesson 28 – Working with Array & Empties
Lesson 29 – Finalizing the Details for the Goblets
Lesson 30 - Finishing our Jewel Props

Section 11 – Working with Different Kind of Texture Maps

Lesson 31 – Working with Atlas Texture Maps
Lesson 32 – Creating the Books & Paper
Lesson 33 – Creating Larger Props from Smaller Ones

Section 12 - Bread & Butter Modelling

Lesson 34 – The Best Workflow for Barrels
Lesson 35 – Easy Ways to Create Crates
Lesson 36 – Simplifying Prop Models
Lesson 37 – Other Ways to Work with Seams
Lesson 38 - Adding Damage to our Models

Section 13 – Working with Water

Lesson 39 – Creating a Water Material
Lesson 40 – Finishing Our Barrel & Crates

Section 14 – Working with Decals

Lesson 41 – Importing Images as Planes
Lesson 42 - Using Decals & Shrink-wrap Modifier

Section 15 – Advance Modelling Techniques

Lesson 43 - Creating our first Chest Prop
Lesson 44 – Working with Bevel Shapes
Lesson 45 – Creating Handles & Locks
Lesson 46 – Creating the Small Chest Prop
Lesson 47 – Finishing the Chest Modelling

Section 16 – Creating Treasure

Lesson 48 - Texturing our Small Chest Prop
Lesson 49 – Creating the Treasure Material
Lesson 50 – Starting the Coin Pile
Lesson 51 – Working with Displacement
Lesson 52 – Creating the Smaller Coins

Section 17 – Combining Props

Lesson 53 – Populating the Treasure Chest

Section 18 – Working with More Complex Curves

Lesson 54 – Using the Add Curves Blender Addon
Lesson 55 – Creating the Torn Scroll Edge Effect
Lesson 56 – Creating a Parchment Roll

Section 19 – Creating more Complex Props

Lesson 57 – Adding Seals & Stamps to our Scrolls
Lesson 58 – Adding Writing to our Parchment
Lesson 59 – Finishing the Scrolls

Section 20 – Speeding up our Workflow

Lesson 60 – Working with Perimeter
Lesson 61 – Finishing off the Cage Model
Lesson 62 – Adding Textures to our Cage

Section 21 – Creating Furniture Like Ikea

Lesson 63 – Starting the Bookcases
Lesson 64 – Creating Variations in our Bookcases
Lesson 65 – Adding the Bookcases to our Asset Manager

Section 22 – Working with Cloth

Lesson 66 – Starting the first Wall Banner
Lesson 67 – Using Blender Sculpting Mode
Lesson 68 – Finishing the Banner Models
Lesson 69 – Creating the Cloth Material
Lesson 70 – Adding Decals to our Banners

Section 23 – Customising Decal Materials

Lesson 71 – Modelling the Stocks
Lesson 72 – Adding Blood Decals
Lesson 73 – Combining Knife & Shrink wrap Tools

Section 24 – A Crash Course in Geometry Nodes

Lesson 74 – Starting our First Geometry Node
Lesson 75 – Adding Variable to the Geometry Nodes

Section 25 – Game of Thrones Style Stocks

Lesson 76 – Modelling the X Stocks
Lesson 77 – Working with the Loop Tools Addon
Lesson 78 – Adding in our Geometry Node Chain
Lesson 79 – Texturing the X Stocks Prop

Section 26 – Working with Emission Materials

Lesson 80 – Starting our Torch Models
Lesson 81 – Creating Ornate Models with Curves
Lesson 82 – Finishing the Torch Models
Lesson 83 – Creating Embers from Emission

Section 27 – Creating Realism in our Prop

Lesson 84 – Modelling the Prison Bed
Lesson 85 – Adding Stability to the Bed
Lesson 86 – Building up Straw Decals for Realism

Section 28 – What is Modifier Stacking

Lesson 87 – Starting our Candle Props
Lesson 88 – Working with Remesh and Decimate Modifiers
Lesson 89 – Adding Textures & Emission to our Candles
Lesson 90 – Finishing the Candle Props

Section 29 – How to Create Low-poly Weapons

Lesson 91 – Creating the Sword Blades
Lesson 92 – A Sword has to Have a Guard
Lesson 93 – Modelling the Weapons Rack
Lesson 94 – Creating a Simple Shield Prop

Section 30 – Creative Ways of using Topology

Lesson 95 – Planning out the Helm Model
Lesson 96 – Adding Details to the Helm Prop
Lesson 97 – Texturing our Weapons
Lesson 98 – Troubleshooting Decal Issues

Section 31 – Creating More Complex Geometry Nodes

Lesson 99 – Starting the Rope Geometry Node
Lesson 100 – Realizing Instances & Decimation

Section 32 – Modelling the Final More Complex Props

Lesson 101 – Creating the Rack Base Mesh
Lesson 102 – Working with Boolean Modifier
Lesson 103 – Speeding up Workflow with Geometry Nodes
Lesson 104 – Finishing the Rack Modeling
Lesson 105 – Texturing the Rack Prop

Section 33 – Bringing all our Modelling Techniques Together

Lesson 106 – Starting the Guillotine Model
Lesson 107 – Bringing Structural Accuracy to the Mix
Lesson 108 – Working with more Ornate Models
Lesson 109 – Creating Functioning Details
Lesson 110 – Finishing the Last Dungeon Prop

Section 34 – Working with Blender Cycles X

Lesson 111 – Setting up Cameras & Clipping

Section 35 – Compositing Renders

Lesson 112 – Working with the Blender Compositor

Section 36 – Welcome to Realtime Rendering

Lesson 113 – Working with the Eevee Render Engine

Section 37 – Learning about Animation Paths

Lesson 114 – How to Present our Work with a Turntable

Section 38 – Unreal Engine 5 Blender Setup

Lesson 115 – Lean how to set up Blend files Ready for UE5
Lesson 116 – Final Blender Lesson & Finalizing our Project

Section 39 – Exporting Blender assets

Lesson 117 - Exporting Assets as an FBX file

Section 40 – Introduction to Unreal Engine 5

Lesson 118 - Creating New Unreal Engine 5 Project
Lesson 119 - UE5 Introduction to UI
Lesson 120 - UE5 Introduction to Viewport Controls

Section 41 – Importing assets to UE5

Lesson 121 - Importing 3D Prop Collection
Lesson 122 - Organising the props within our world
Lesson 123 - Importing and Setting up Textures

Section 42 – Reasigning Material Instances

Lesson 124 - Naming Material Instances
Lesson 125 - Material Instances
Lesson 126 - Assigning Wax and Flag Material Instances

Section 43 – Adjusting Texture for our PBR materials

Lesson 127 - Correcting Texture map Brightness values
Lesson 128 - Setting up Normal Intensity Parameter

Section 44 – Setting up Metal Material

Lesson 129 - Setting up Metal Material Instance
Lesson 130 - Fixing Material Reference
Lesson 131 - Applying Grainy Metal

Section 45 – Creating Parameters to Adjust our Material Instances

Lesson 132 - Setting up Roughness Contrast
Lesson 133 - Adjusting Base Color Values
Lesson 134 - Setting up Scroll Roughness using Buffer Visualiser

Section 46 – Assigning Multiple Textures

Lesson 135 - Applying Material Instances at a pace

Section 47 – Working with Transparency

Lesson 136 - Setting up Opacity Texturures and Fixing Nanite problems
Lesson 137 - Setting up Two Sided Transparency
Lesson 138 - Refractive Material with PBR Transparency

Section 48 – Creating Additional Color Control for our Materials

Lesson 139 - Creating Full Material Color Control

Section 49 – Working with decal

Lesson 140 - Setting up PBR Decal Blood
Lesson 141 - Setting up Blueprints with Decals

Section 50 – Setting up Transparency Overlay Materials

Lesson 142 - Setting up Transparency Mat with PBR Detail
Lesson 143 - Applying Transparent Sigils and Straw Onto Assets

Section 51 – Working with Collisions in UE5

Lesson 144 - Setting up Collisions
Lesson 145 - Setting up Mesh as Collision
Lesson 146 - Setting up Interactable props
Lesson 147 - Working with Smaller Props for Collisions

Section 52 – Setting up Prop Collection Prefabs

Lesson 148 - Creating Asset Collections
Lesson 149 - Setting up Asset Collections with Physics
Lesson 150 - Setting Shelf blueprint with Partial Collision

Section 53 – Creating Torches and Candles

Lesson 151 - Creating Emissive Textures for Light Sources
Lesson 152 - Setting up Fire Particle Animation
Lesson 153 - Creating Fire Particles
Lesson 154 - Setting up Light Flicker Code
Lesson 155 - Setting up Candle Blueprint

Section 54 – Rendering our work in UE5

Lesson 156 - Setting up Presentation
Lesson 157 – Setting up Turntable Render

Section 55 – Setting up 3D Prop Pack for Other Unreal Engine Projects

Lesson 158 - Importing Asset Pack
Lesson 159 - Using Asset Pack

Screenshots

Blender to Unreal Engine Become a Dungeon Prop Artist - Screenshot_01Blender to Unreal Engine Become a Dungeon Prop Artist - Screenshot_02Blender to Unreal Engine Become a Dungeon Prop Artist - Screenshot_03Blender to Unreal Engine Become a Dungeon Prop Artist - Screenshot_04

Reviews

Javier
September 12, 2023
Tengo experiencia en Blender 3d y el modelado 3d. Me gusta seguir cursos como los de Neil Bettison porque me ayuda a reforzar y aprender nuevas formas de trabajo. Gracias por ser tan claro y apasionado para enseñar.
Logan
July 27, 2023
Great information for a complete beginner, I've been diving into Blender recently so I know everything covered here, but this will be instrumental to others that are just starting.
Ewerton
June 25, 2023
That's great, I finally understand how UV works properly and it helped me a lot advancing my studies. Thank you... Just following and studying more...
Mert
May 30, 2023
Beklediğimden kat ve kat iyi bir anlatımı var hocamızın. Sevgili hocam bir ricam var lütfen SUBSTANCE PAİNTER dersleri de anlatın. O da en az Blender kadar önemli.
Brandy
April 14, 2023
Quick, informative, explains well and moves quickly enough to not feel like it was droning or losing attention. Voice sounds bright and alert, keeps me engaged. So far so good!
Eric
February 19, 2023
Very good tutorial. I finished the modeling. The difficulties are increasing. And especially when we need help, we get a response. Bravo and thank you.
Roberto
February 14, 2023
I really enjoyed the course. I learned a lot of modelling amd texturing techniques and workflows. The course content package is excellent and it makes your life much easier.
Kevin
November 19, 2022
I will confess, I'm only at Section 7, but it keeps asking me to leave a review, so here goes. Its an OK course, but there are some flaws, especially in the texture UV dept. If you want to use something like Substance Painter to paint textures, then this teaches you some bad habits like overlaying UVs, which is not good. Another thing is, he goes really fast. I had to keep pausing, playing, pausing etc. Way to fast for me, but some might like that. The course overall (so far) is a little basic, and it jumps around a lot into different sections, (seemingly) uses clips from other courses he's done, and it doesn't seem to flow natrually. If you already know how to use blender, I'm not sure there is a lot here for you.
Valters
November 2, 2022
Great course! Before this course I knew nothing about Blender and now got all I need to draw practically any item I have at home and not only. You will learn by doing-trying. This is the way how to learn and remember. Lecturer speech is fast enough and at some time you will realize, that you know what will be next he is going to say/do. That means that you have some understanding of Blender. And lecturer responses to your questions about course issues is realy fast, within 24 hours, that means that you will get answers fast and will understand your mistakes and be able quickly fix those. This is very important to me to quickly move on. Thanks! Valters
Thom
October 11, 2022
3D Tudor puts tutorials together very well. I have a number of their tuts and have been very pleased w them.

Coupons

DateDiscountStatus
2/20/202388% OFF
expired
5/25/2023100% OFF
expired

Charts

Price

Blender to Unreal Engine Become a Dungeon Prop Artist - Price chart

Rating

Blender to Unreal Engine Become a Dungeon Prop Artist - Ratings chart

Enrollment distribution

Blender to Unreal Engine Become a Dungeon Prop Artist - Distribution chart
4911324
udemy ID
10/3/2022
course created date
10/27/2022
course indexed date
Bot
course submited by