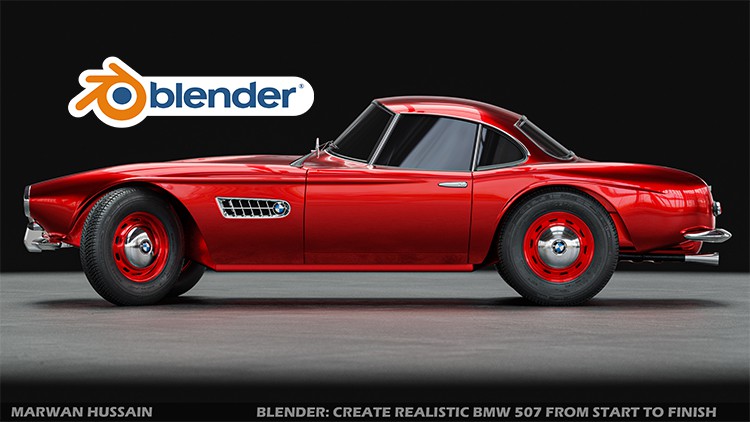
Blender: Create Realistic BMW 507 From Start to Finish

Step by step we will learn how to create realistic 1957 BMW car with Blender 2.92 from start to finish.

4.75 (125 reviews)
Udemy
platform
English
language
3D & Animation
category
instructor
778
students
19.5 hours
content
May 2022
last update
$69.99
regular price

What you will learn

Learn how to set up the scene and add the blueprint images in the right way.

Understand how subdivision and shrink wrap modifier works.

Learn how to model the car and how to avoid shading problems when you add the subdivision modifier.

Learn the Shrinkwrap modifier technique to kill any shading problem when you add an edge loop to the geometry.

Learn how to add details to the surface without ruin the surface shading and keep it smooth.

Learn how to use bool tool addon in specific situations.

Learn how to use the displacement modifier to create the Tire trade.

Learn how to create multiple UV maps for the tire to add more details and texture to it.

Learn how to use Armature to rig the car.

Learn how to use damped track constraints to rig the front tire to achieve the ability to turn it to the left and right.

Learn how to use transformation constraints to make the tire rotating on its own axis.

Learn how to create nice-looking and realistic car paint material.

Learn how to create realistic tire material with multiple UV maps.

Learn how to create rubber and plastic materials.

Learn how to set up the environment and create realistic lighting with HDRI images to illuminate the scene.

Learn how to add the camera and take the final shoot.

Description

Hi everyone, my name is Marwan Hussain I'm a 3D artist and I have been in the 3D field for 9 years now, I like to use Blender to create anything I want and in this course, we will learn how to create a 1957 BMW car from start to finish with Blender 2.92.

Creating a car like BMW 507 is a bit challenging because the surface is curvy or I can say it's organic and not flat, this is reason that makes creating cars like BMW 507 a bit challenging, but with the right modeling technic you can achieve very clean results.

And the beautiful thing about Blender it can handle that kind of organic modeling in a smart way by using the ShrinkWrap modifier, this is the secrete that I will use to kill any bad shading on the surface.


So we will go through all the details that you saw in the intro video, if you didn't see the intro I advise you to see it first to see the final result and how it looks.

When the modeling journey is finished we will jump to the materials section, there, we will learn how to create the car paint material and the other materials like Rubber, Chrome, Plastic, and Iron, this section will be very fun and informative.


Rigging, yes we will rig the car and we will learn how to use armature step by step, first, we will add all the necessary bones and after that, we will learn how to create a relationship with them by using constraints like damped track constraints and transformation constraints.

And now it's time to render the scene, we will add the camera and we will take a nice shot and we will learn nice technic about how to use DOF ( depth of field ) to take a close shot.

This is all about the course, in a nutshell, inside the course, there is tons of information that will take your level and ability to the advanced stage when it comes to car modeling.

The last thing that I want to add here is if you finish this course and learned how to create cars in general that's mean you can sell them online and make some money.


Content

Introduction

Introduction

Modeling section

course overview
03_understand the subdivision surface modefire
04_understand the subdivision surface modefire part 2
05_understand the subdivision surface modefire_part 3
06_understand the mirror modefire
07_Adding the ref Images
08_Modeling the Grill and the fender part 1
09_Modeling the Grill and the fender part 2
10_Modeling the Grill and the fender part 3
11_Modeling the Grill and the fender part 4
12_Modeling_ creating the hood
13_Modeling_ creating the hood part_2
14_Modeling_Adding hole to the body
15_Modeling_creating the doors
16_Modeling_Creating the back side of the car
17_Modeling_Creating the back side of the car part 2
18_Modeling_Creating the back hood
19_Modeling_Creating the roof
20_Modeling_finish the roof and fixing the door shading
21_Modeling_fixing some shading issue
22_Modeling_Creating the windshield
23_Modeling_Creating the windshield borders
24_Modeling_Creating the rear window
25_Modeling_creating the door window
26_Modeling_Creating window frames
27_Modeling_Creating window frames part 2
28_Modeling_Creating the roof frame
29_Modeling_Creating the front lights
30_Create the grilles
31_Modeling_edit the grilles
32_Modeling_Creating the front bumper
33_Modeling_ working on the hood details
34_Modeling_adding details to the side
35_Modeling_creating the mirrors
36_Modeling_Creating the Back lights
37_Modeling_make some editing to the rear Hood
38_Modeling_adding details to the rear side of the car
39_Modeling_Creating the back bumper and make some fixes in the body
40_Modeling_adding cover to the bottom side of the car
41_Modeling_Creating the door handle
42_Modeling_ Creating the fuel tank
43_Modeling_Creating the exhaust
44_Modeling_Creating the wheel and the tire
45_Modeling_Creating the wipers
46_Modeling_Creating the wipers_2
47_Modeling_Creating the wipers_3
48_Modeling_Creting the wipers_4
49_Modeling_preparing the logo and cover the grill area
50_Modeling_Creating the brake drum

Environment

51_Environment_illuminating the scene with HDRI image
52_Environment_Creating the ground

Materials Section

53_Materials Section_ Creating the car paint MT
54_Materials Section_Creating the chrome MT
55_Materials Section_ Creating the tire MT
56_Materials Section_ Creating the break drum MT
57_Materials Section_Creating the BMW Logo MT
58_Materials Section_Creating the HeadLight MT
59_Materials Section_Creating the BackLight MT
60_Materials Section_Creating the front reflector light
61_Materials Section_Creating the Rubber MT

Rigging

62_Rigging Section part 1
63_Rigging Section part 2

Render the scene

64_Render the scene

Bonus Sectoin

65_Bonus

Project Folder

Project Folder

Screenshots

Blender: Create Realistic BMW 507 From Start to Finish - Screenshot_01Blender: Create Realistic BMW 507 From Start to Finish - Screenshot_02Blender: Create Realistic BMW 507 From Start to Finish - Screenshot_03Blender: Create Realistic BMW 507 From Start to Finish - Screenshot_04

Reviews

Dominik
March 9, 2023
I think this is the best course from Mrawan if you want to know how to model complex shapes. The amount of time spent on this one will greatly benefit anyone's modeling skills. I highly recommend it.
Yash
March 4, 2023
Great teacher! Its because of the good intro I kept my faith in this tutorial because afterall it gets tough in the mid and to keep going. Also getting into problems and solving them on the go is also good as we realise anyone can face these problems which isnt very often in the tutorials.
Christopher
February 15, 2023
It's going to be a challenge as I have almost no Blender experience coming into the course. But I am excited to learn!
Andy
November 1, 2022
I am quite an experienced car modeller and I have completed 5 cars from start to finish. Most with interiors. Although I know quite a few techniques especailly shrink wrapping I am finding this course very interesting. I also do tutorials on YouTube and I am very impressed with the delievry and speed of this course. I highly recoomend others to pursue this course until the end. Well done!!!
Jason
September 27, 2022
I have been using blender for a couple of years now, mainly working with purchased models, i work in motorsport and this course is invaluable to me for being able to learn how to model shapes and structures for vehicles, so i can make the bodywork modifications for race cars.
Henry
May 14, 2022
I really wanted to rate this a 5. Marwan is very knowledgeable. His English is good and his attention to detail very thorough. The modeling (section 2) is excellent. You watch him build the car from scratch - almost vertex by vertex, rather can a cube. You watch him correct minor flaws in the model. That is very helpful because we have all faced flaws in our modeling. His four lectures on the windshield wipers is worth the cost of the course alone. I've learn much. This is NOT a low poly course. He adds parts that I would have ignored, but he does so in the name of accuracy. I may not model to that precision, but it's good to know how to do it. Now, why not a 5. Although his English is good, he does have an accent. Sometimes it is difficult to understand what exactly he is saying. I use Closed Caption all the time. But the CC is computer generated and some of the transliterations are gibberish. The transcript is just the CC in a doc format, so that was no help. On top of this, the resolution is not great (sometimes 360p and sometimes 720p) and so there are times I have no idea what he is doing. I just can't read the screen to see what menu item/shader/etc he is using. This was particularly a problem with the materials section (and to a lesser degree, rigging). I don't know if the resolution problem is in the recording, Udemy, or me. I could not find a support page in Udemy to help. Thus, I spent hours guessing. I'd call up a shader I thought he was using and would look if it had the same look as the one he was using. I'm using 3.1 and I think Marwan used an earlier version, even the shader boxes weren't always the same. The result was that in the materials and rigging sections I was spending about 3 hours per 20 minute sessions trying and retrying to replicate what he had done. Very frustrating. I'm in the first of two rigging sections. Frequently I can't make it do what he is doing. Note: The problem wasn't nearly as severe in the modeling section because, for the most part, the commands are fairly limited and easy to figure out what he is doing. I don't expect Marwan to go back and re-record the tutorial in a higher resolution or with 3.1. What I would suggest, is that in the materials, rigging, and more complicated parts of modeling, to see if there are differences with 3.1. (Frequently, I would use the command he suggested and get a very different menu.) Rather than re-record, add a developer's notes as a text file resource in that lecture. I did get through the materials and the model looks wonderful. I don't know if I'll be able to figure out the rigging lectures. My frustration leads me to a 4-star rating. But the breadth and knowledge imparted in the lectures deserve a 5-star rating.
Jesús
January 16, 2022
Un gran curso desde el minuto uno estas trabajando y aprendiendo muchísimos detalles de diseño de un vehículo.
Rupert
December 12, 2021
Very much enjoyed this course. Marwan obviously knows a huge amount about Blender and I learned a lot about the various features, tools and techniques you can apply. I think it helps to do a bit of planning before you start modelling so you can optimise your geometry. Also the whole business of UV unwrapping and materials is a huge area to study.
George
November 17, 2021
Overall I am very happy the way my model is progressing. I am glad that I am not a complete beginner because sometimes the tutorial doesn't seem to show the hotkeys. My modeling has certainly improved.
Arend
September 30, 2021
I looked through the course and found the explanations very informative. The course is also presented in a very professional manner. I will be purchasing more courses given by this instructor.
Prabhul
June 17, 2021
Detailed and clear explanation.Teacher is 100% dedicated.This course will help you to upgrade basic modelling skills to advaned,especially for modelling vehicles.
Trevor
June 1, 2021
Project based course with beautiful result and well explained steps. A little bit knowledge of blender basics is important to follow along. Instructor started with explaining important modifiers used and setting up reference images from different views then he went ahead in creating the classic car in easy to follow step by step down to vertices manipulation to reach the look of this classic beautiful car.

Charts

Price

Blender: Create Realistic BMW 507 From Start to Finish - Price chart

Rating

Blender: Create Realistic BMW 507 From Start to Finish - Ratings chart

Enrollment distribution

Blender: Create Realistic BMW 507 From Start to Finish - Distribution chart
3936044
udemy ID
3/24/2021
course created date
5/23/2021
course indexed date
Bot
course submited by